

Showing posts with label zones. Show all posts
Showing posts with label zones. Show all posts
Friday, September 7, 2012


Sunday, September 25, 2011
Mount Banishment

A twisted and desolate mountain serves as the eternal prison of four evil Demi-Gods that have been sealed away by the all-powerful Zu, the God of Harmony: Tolog, the Demi-God of the Apocalypse was bent on the total annihilation of the world. Pakar, the Demi-God of Purity, was once a righteous angel whose obsession with the purification of all living creatures became an unending quest of the purging of those that weren't of the most purest judgement. Zooox the Demi-God of Wildmagic, who was once a powerful, yet secluded wizard that was scarred and forever changed by the great Spellplague into a prevaricator of chaos. And of course Lokpan the Plotter, an otherworldy greater demon with God-like powers and an insidious influence upon those of wicked heart. Those who walk the earth serving the powers of darkness are often attracted to the unholy might of at least one of these fiendish powers, including worshipers and sorcerers who wish to extend their strengths beyond the prime plane or simply seek the blessing of their dark lord based on ancient prophecies and dark rituals. Nevertheless, Mount Banishment is often visited by such persons and perhaps seek to reincarnate their imprisoned Gods.
Mount Banishment is an excellent zone: short, sweet, with a non-linear design and nicely-stylized equipment of varying use. Entering the Mountain, the first room and couple of battles is almost like that of a grid-zone, despite being tunnel-based. The leader can also choose to take the zone from different angles, as there is no linear path from Demi-God to Demi-God that can be satisfied in no particular order. The zone can be completed by small groups of high levels or very small groups of end-game levels, while the equipment also has a wide range of use from the ever-useful +20 hitpoints -3 save_spell ear cuff of balance to the +5 max_con boots emitting dust.
Monday, June 13, 2011
Ny'Neth Stronghold

An ancient, gloomy keep serves as the dark lord Ny'Neth's conduit between worlds, including its native prime material plane. Three portals at the heart of the aged castle immortalize the furiously-magical mind of Ny'Neth, a once powerful and spiteful young wizard who grew into the twisted, otherworldly-magical being that has merely taken on a youthful form in its ageless existence. One of Ny'Neth's many ways of nesting himself in his hellish sanctuary was to create two constructs in which he imbued his own mind that were set in the most vile reaches of the underworld. The first of which is seen here in a zone simply named Ny'Neth Stronghold, or nyneth, nyneth1, ny1, among others.
Although as a whole, the 3-zone Ny'Neth set is quite an experience, the first segment is actually quite simple and an excellent introduction to end-game Duris. Featuring excellent equipment, experience, and epic points, it is Ny'Neth's proudest achievement, in this designers opinion, in the stylization and careful detail in the mob names, item names, and colorization. Ny'Neth items are extremely easy to discern from the rest of the MUD by their heavily-seasoned flavoring. Made by Aretean, the same designer of Aravne, Ny'Neth Stronghold is an incredibly satisfying MUD experience.
Tuesday, May 3, 2011
Labyrinth of No Return
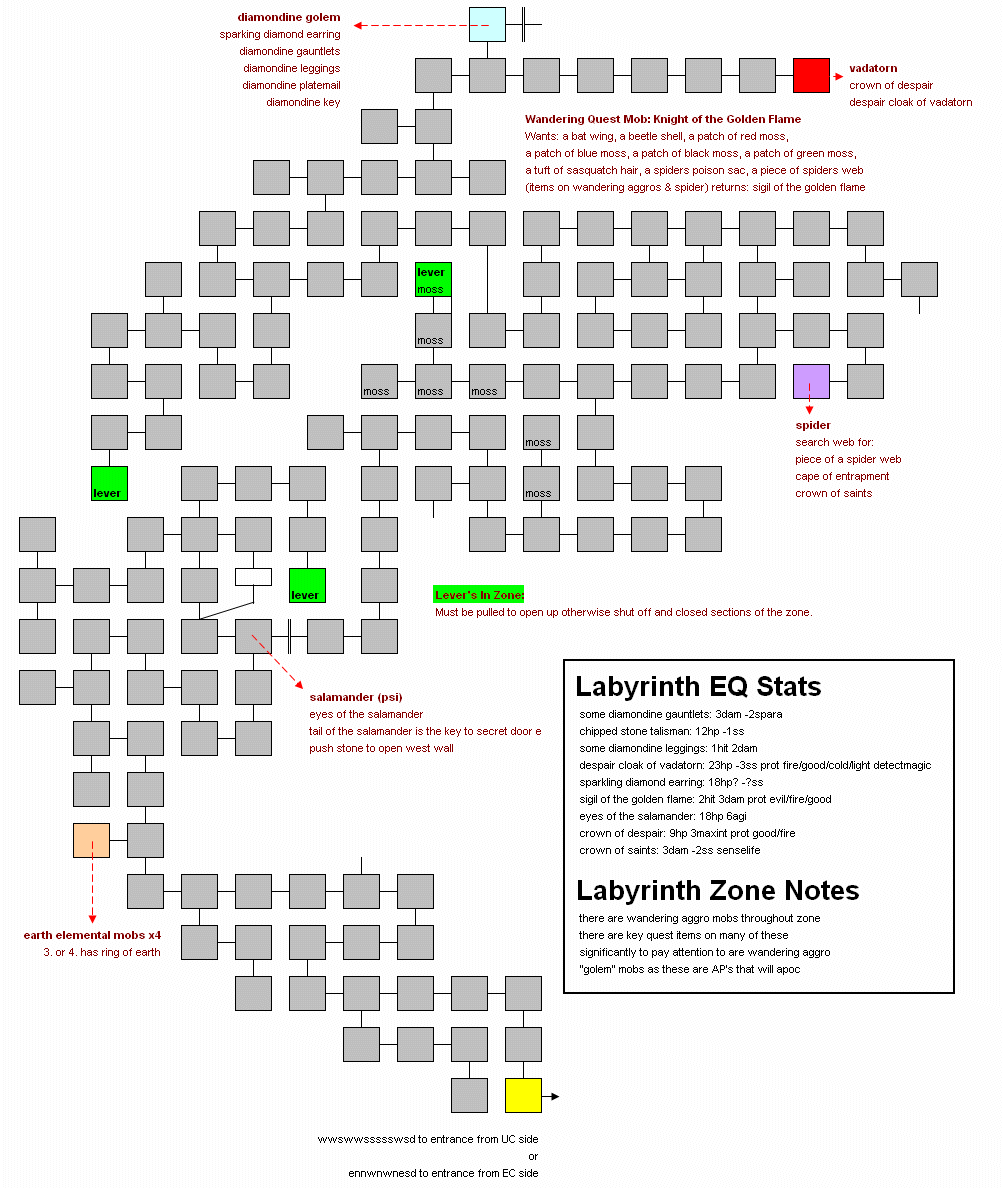
(click to enlarge)
The Labyrinth of No Return... the deep, twisting maze below the Lava Tubes, is an unforgiving set of no-teleport tunnels that contain creatures ranging from giant spiders and centipedes to huge, hulking elementals of dolomite, to fearsome minotaurs.
The Labyrinth of No Return features features decent high level equipment and interesting mob types, and a few quests. A couple of my favorites are the eyes of the salamander (18 hitpoints, 6 agi), and the sparkling diamond earring (15 hps -1 save_para), and of course black sapphire earring (10 hitpoints, prot gas). Players have the option of killing Vadatorn for his max int crown and hp/saves cloak, or turning in the minotaur parts for a perm farsee held crystal ball. Also 9 various items collected throughout the zone can be turned in to the Knight of the Golden Flame for a sigil of the Golden Flame (hit/dam, prots). Farsee and basic prots are crucial affects that are much more common in end-game, but among the most sought-after items in early-wipe, making the Labyrinth of No Return an excellent zone choice to do for those who can lead it.
Labby is a complex step-by-step style zone that doesn't just feature deathmarching through endless mobs, like a lot of the newer zones. This makes it one of the most unique and seasoned zones in Duris history!
Sunday, April 17, 2011
High Moors

(click to enlarge)
The High Moors, one of the most colorful and well-written zones on Duris' Evermeet. Home of the druid Yingin, who you will meet in the first few rooms of the zone, Hoorgash, a two-headed bridge troll, Dr. Fester, a reclusive scientist dabbling in re-animating dead flesh, Gorgimera, a ruthless sunken beast, and many others.
The High Moors has featured quite a bit of items that have seen their stats fluctuate throughout the years. However it is still a great source of a two-handed haste weapon, silver-inlaid mandibles, located on the queen beetle (#8 in the above map). This haste item is one of the most known unknowns on Duris. Does not really offer much to a hitter, or many end-game casters, but can be an excellent backup haste item for any caster or a perfect caster haste item for a sub-endgame character. It also is an excellent fit for Minotaur and Ogre shamans, Ogre hitters, and Thri-kreens due to their extra wielded slot versatility.
Wednesday, April 13, 2011
Desolate - The Master's Test
Desolate, a logging village nestled on the coast of the ocean off a temperate, wooden oasis on the fringes of the great Calimshan desert. The Master's Test can either grant some decent mid-high level equipment, or some decent mid-high level equipment plus an epic stone, depending on whether or not Desolate Under Fire loaded. The only real difference between these zones are the existence of aggressive mobs on the road leading up to the Master's Test.
The segment specifically called "The Master's Test" is only a few rooms deep, each posing a different mob with a different challenge and strategy. See the guide below on how to reach the Master's Test, and what to expect. Personally, mask of vitality (large amount of +hitpoints and +con) and ring of celestial wonders (mage only, perm barkskin) are two of my favorite items and are generally pretty easy to get for a small high level group.

The segment specifically called "The Master's Test" is only a few rooms deep, each posing a different mob with a different challenge and strategy. See the guide below on how to reach the Master's Test, and what to expect. Personally, mask of vitality (large amount of +hitpoints and +con) and ring of celestial wonders (mage only, perm barkskin) are two of my favorite items and are generally pretty easy to get for a small high level group.

(click to enlarge)
Thursday, April 7, 2011
Barovia 2 Segment Conceptualization - Kashtrakis/Chernovog

Kashtrakis is a fictional hall, housing the evil Devil God of Chaos named Chernovog. Kashtrakis is described in Barovia2 as a blackrock stronghold, sitting on the top of an unclimbable cliff-face located in the 732nd plane of Hell (contrary to the "666 levels of the Abyss").
This drawing was the conceptual start of Kashtrakis, starting with the landing point one reaches when teleporting through Baba Zelenna's pentagram. The pentagram takes players to the cross of rooms adjacent to it, which leads to a small bone drawbridge and a ledge (which is labeled above with "1" and "2", arrows pointing inwards). This ledge contains 2 levers - one that releases extra two "HUGE mariliths" and the other that opens the gates to Kashtrakis. Once inside players battle through a grid and then come across The Well of Corruption, occupied by three [grouped] bebiliths and two murks. Clearing this room is essential, as it is the landing room of the three Void Prisons. Directly following the Well of Corruption is Chernovog's throne room, which feeds into the three Void Prisons. The Void Prisons, depicted as the three floating circles surrounding the throne room, on the upper right corner of the above drawing, are occupied by two tortured souls apiece, and rifts leading back to the Well of Corruption.
Although short, this sub-section of Barovia2 is one of my proudest creations. Rather than most zones where players charge right up to the end boss and do nuke runs until it is defeated, Chernovog's fight requires players to first clear the Well of Corruption and Void Prisons before attempting Chernovog. It also forces players to move on their own, out of the Void Prison, and Well of Corruption, back to the throne room when doing runs. Things also can get interesting when Chernovog moves into a Void Prison - which are only exitable by "entering rift" out of combat. This sub-section also provides a very interesting, and potentially devastating, PVP encounter as one cannot leave this Kashtrakis sub-section how they entered - only after defeating Chernovog. Furthermore, none of the mobs in the landing following the pentagram, or in the main foyer of Kashtrakis, require killing to advance to the throne room. Blocking/skipping mobs here would require a raiding party [or a CR group in the event of a mass] to deal with these mobs and most likely alert others of their presence.
Tuesday, April 5, 2011
Crystalspyre Mountains

Zikata's room is located just north of a room of 4 backstabbing guards. This guard room, and a few before it in the same hallway, are !magic. These mobs are all medium in size, so sending in a huge or tiny sized pet or meatshield would cause the mobs to just engage [without backstabbing] and promptly flee. Separating them this way should be easy enough, but there are only four of them and it is an easy room to charge with some nice hitters.
Zikata's room is castable, which works a lot more towards Zikata's advantage. Besides being guarded by 2 of the same backstabbing guards, Zikata is also protected by Yin and Yang. Two demon mages - a necromancer and a sorcerer respectively. Zikata is a shaman, and a tracker.
One other thing that makes this zone a little tricky is the very quick repop time - which is every 10-20 minutes. Sometimes killing the minions, waiting for them to repop, and killing them again quickly is the way to go.
The reward for this zone is the crown of opposition - +30 hps -3 save_spell, perm soulshield, !Mage. An item whose stats have withstood the test of time, and a very solid item.
Definitely a unique zone in that it is not your typical slaughter-through-guards fest, but more of a puzzle followed by a tricky couple of rooms, for one a single item rather than many.
Monday, April 4, 2011
Fort Boyard

(click to enlarge)
A spectacular zone featuring some nice zone elements like above average equipment, movable switches that open blocked exits, sentinel mobs that require DOT (damage-over-time) luring, and rooms with multiple mobs that should be killed in certain orders. All of which is wrapped up in a well-stylized environment. Large groups of mid-high level players, or small groups of high-level players, or very small groups of elite end-game players, can make short work of Fort Boyard.
These things all make Fort Boyard a great zone to learn very early in one's Duris career, and an excellent learning mechanism to familiarize prospective zone leaders with very different types of fights and a few advanced zone mechanics. Shortcuts, like dim targets, are revealed pretty quickly after one or two walkthroughs, and there are a few items here and there that people, who are so inclined, might just target to ninja-grab out of the zone without completing the zone in its entirety. (Dragonscale gloves and ruby-lined slippers are a couple of my old favorites that can really compliment a nice set of caster gear very well.)
Sunday, April 3, 2011
Aravne, the Forest City

(click to enlarge)
Aravne, the forest city..
Shadows cast upon the prime tree of Aravne as a once-proud king has succumbed the powers of evil. A dark, unknown presence has corrupted the king, and with him the prime tree.
A lot of great stuff is found in Aravne, definitely one of the major peripheral cities of all time. There are inns, arti-locating xixchil, easy experience, cool items (like sun ring, and kings blade), and a great style to it all.
Aravne has historically been one of the big hotspots of Khomani-Khan, featuring a sub-section of a Thri-kreen settlement.
Subscribe to:
Posts (Atom)